
After I finished the Silk Purses photo-montage tutorial the other day, I thought of some other ways to combine the same 2 photos. These are even easier, since there’s no masking involved; it’s just the rose photo layered in between or on top of the 2 lettuce layers. (If that sounds incredibly strange to you, you’ll want to check out the previous tutorial.)
Step 1: Get your background layers ready
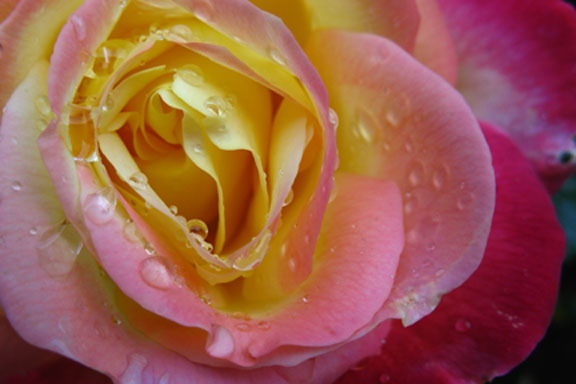
Once you’ve worked your way through the first step, where you make 2 copies of your background photo and apply separate effects to each of these 2 layers, you’re ready for this project! You’ll just need your main photo; in this tutorial, I’ll use the same rose photo as before, to show you how you can get many different looks from the same 2 photos. We’ll just combine them a little differently.
Tip: You can use just one layer for the background, but it’s still a good idea to have a copy of the original layer.
Another tip: I’d advise a Save As here, using a different name. You may want to use those background layers later, with another photo.
Step 2: Add your main photo
With the background layers document open, open up your main photo; drag or copy/paste it into the background layers document.

We could just leave it like this, but let’s experiment a little more.
Step 3: Change the layer order and opacity
Drag the rose layer to the top position, and change the opacity of this layer to 50%.

Step 4: Adjust a background layer
Now let’s try changing the Blend Mode on the middle layer; I used Soft Light, but this is a great place to experiment with different modes. Change opacity to 30% (or to your taste) while we’re on this layer:

Step 5: Change the Blend Mode of the rose layer
With the rose (top) layer selected, and still at 50% opacity, change the Blend Mode to Color Dodge.

As you can see, you could stop after any one of steps 2—5, and have a beautiful image. I haven’t changed anything with the bottom layer; it’s at 80% opacity (the setting from the project in the first Silk Purses post), but you can change this, maybe add a new texture or lighting effect…
There are so many possibilities in a program like Photoshop, honestly, sometimes it’s hard to know when to actually finish! That’s a good reason, at least once in a while, to just keep it simple: a beautiful image layered creatively with a complementary background.
I’d really love to see what you come up with, using your own photos!
